
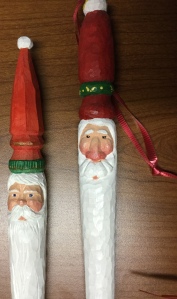
222. Carving in the round. Old World Father Christmas.
This is a really old piece. I like the reminders of the story of Saint Nicholas. There was a real Nicholas. He was a 4th Century Bishop of the church, a wealthy man who lived in Turkey. He became well known for his acts of kindness and gifts to the poor and needy.
His reputation was passed on to 16th Century Europe. In England “gift givers” were referred to as ‘Father Christmas,’ France ‘Père Nöel,’ Germany ‘Christkind,’ the Netherlands ‘SinterKlaas’ (notice the tie back to Saint Nicholas). And in America, Sinter Klaas became ‘Santa Claus.’ No matter what the name, this figure reminds me of the original love motivating the gift giver, a tradition worth continuing.
The piece is basswood. The colors are Old World – ivory, winter green, ruby red, white, and gold. The face is medium flesh with a rose wash. All the colors except for white, are a ratio of 1/15 paint to water. It was finished by being dipped in boiled linseed oil.
Merry Christmas, Frohe Weinachten, Joyeux Noël, Vrolijk Kerstfeest.
Shalom.

“Love and faithfulness keep a king safe; through love his throne is made secure.” Prov 20:28
219. Collections and ideas. Old World Father Christmas, Saint Nicolas, Santa Claus, Sinter Klaas.
Where do your carvings or hobby projects go? Some sit on shelves at home because we can’t part with them. Some sit in boxes because there isn’t any more room on the shelves. Some sit on work benches or tables for years, “nearly” finished.
And some go to family and friends. Here is part of a collection held in Michigan. It is a joy to see others find pleasure in the things one creates. Perhaps this is the year for you to let go of more of yours. Gift them, donate them, sell them, but let the world enjoy them.
Merry Christmas
Shalom.
“What a person desires is unfailing love…” Prov 19:22a
213. Egghead. Sleeping Santa.
A fun afternoon project. The design began with a hesitation to attempt another set of eyes. Easy fix, cover the eyes with the hat. Many iterations later you have this piece.
What I like about it most is the hat. The brim and tassel were first outlined with a veiner. Then the green upper part is cut with large, flat strokes. The tassel results as the upper green is completed. The brim is rough cut as a wavy line. It is then textured with a small U-gouge. He looks happy and rested, ready for cookies and milk to come.
Shalom.


“Better a patient person than a warrior, one with self-control than one who takes a city.” Prov 16:32
211 Egg head. A Tartan Santa.
One of the joys of carving is the opportunity to try different things. This is an egghead. Many of these have been done. I have tried 500+. So why keep trying them? Variety within a field.
This head was an experiment in creating plaid. The covering could have been a traditional Santa hat painted plaid. But that didn’t seem enough. So the tam and the plaid make it. I think pitting the front edge of the tam nearly over the eyes also works. It creates a tension that helps the overall effect.
Shalom.


“A perverse person stirs up conflict, and a gossip separates close friends.” Prov 16:28
209 Egghead. Father Christmas, of course.
What do you do with a wooden egg, basswood? Make an egghead, of course. A bald egghead. A Father Christmas, bald, basswood, egghead. Green shirt with a hint of red on the chubby checks and a snow-white beard and hair. He has to be smiling, naturally. Squinty eyes are best. That way you can imagine the hohoho better. More eggheads in the following posts.
Shalom.


“Better to be lowly in spirit along with the oppressed than to share plunder with the proud.” Prov 16:19
208 Christmas is coming. Father Christmas.
It is possible that you, in this season of Thanksgiving, are already making plans for family gatherings, both the Thanksgiving meal and for the Christmas holiday. Are your carving or crafting preparations coming along well, too?
Here are a couple of older pieces held in private collections in Illinois and Michigan. Father Christmas or Saint Nicolas done in spokes from recycled kitchen chairs. The spokes are maple, a hard wood, a challenge to carve by hand. They would be good for dremel tools or other power tools.
The first step was to skin the varnish and stain layer from each piece. The hardness of the wood meant the stain had not penetrated too deeply. Next step was to decide where on the spoke to place the face and how large the face should be. Once the face was roughed in, the next decision was texturing. What texture would the hair and the beard have?
A further step was shaping the hat and its decoration. You will notice that the piece on the right retains more of the original spoke shape, while on the left the hat has modified the spoke more. A final step was color choices and painting. These pieces are designed to hang in a Christmas tree, adding color and attracting attention to the tree.
What are you working on this season? Anything to share?
Shalom.
“How much better to get wisdom than gold, to get insight rather than silver!” Prov 16:16

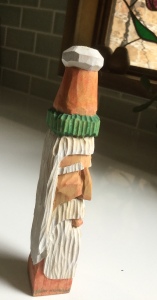
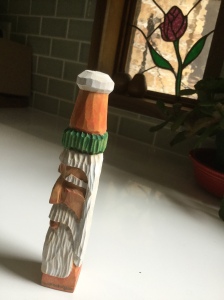
203. Carving in the round. Square Father Christmas.
Well, perhaps not completely round. It is a unique piece, nonetheless. A change from all the round, rolly polly figures one sees.
The layout for this carving took longer than the actual carving. I do like the formal effect that the straight lines and symmetrical shapes give to the piece. I also like the shadows created by the gouge lines in the hair and beard.
Hope you are enjoying your hobby too.
Shalom.

“Plans fail for lack of counsel, but with many advisers they succeed.” Prov 15:22
170 Driftwood art. A Father Christmas face.
Have you ever tried a piece of wood and thought, “Shoot, this is way too tough, can’t do this one. Well, that is what happened here. And why this piece sat in a box for ten year. And why I am not sure it even worked once it came out of the box. But someone thought it fit. It sits in a collection somewhere.
What I like about it is the center out. By that I mean, beginning at the checks at the center of the wood, we go from smoothest to roughest. I do not sand very much. This face called for it. So, sanded checks and nose, less sanding to brow, no sanding to lips, rougher texture to hair and beard, and finally out to the rough, even weathered edges.
The squinted, happy eyes made the piece for me. What do you think?
Shalom.
“Better to be a nobody and yet have a servant than pretend to be somebody and have no food.” Prov 12:9

#75 Wood carving: Old Fashioned Face – Tom Wolfe style.

Old Fashioned Face – front view
I am not sure about you, if you are a wood carver, but I have to suspect you have at least two boxes in your house that are like mine. The first box has to be filled with carving ideas, half finished carvings or carvings that are nearly there, but not quit completed. Anyone have one of those? Or perhaps it is three or four or more. I have several boxes, not sure how many. Some contain carvings I will never get to or return to. They are carvings done early on in my career. I ran into a problem, got bored, or lost interest. Always put aside with a promise of getting back to it some day. Some will never be completed because the original idea was to simplistic or poorly conceived so they are not worth the time and energy to complete. Others would require more effort and thinking than I have available to me at this point.

3/4 view
The carving above has made it out of the “nearly completed” box into the “to be painted.” But, since I do not have the time to carve, let alone paint, in the month of July, it sits unfinished.

Old Fashioned Face 3

Old Fashioned Face right hand profile

Old Fashioned Face rear view
I like the flow of this face. The large nose and over-sized cheeks catch attention. I worked on the hair and beard, trying to break them into large hair masses first and then into smaller “individual” hairs or hair groups. I think paint will draw even more attention to the hair masses.

Final view
The piece is still not painted, so anyone wanting to buy this piece could request custom coloring. With some flashing eyes, gold trim and rosy cheeks, this could be a stunning piece. Contact me here or at http://www.klomp5@hotmail.com.
“The wise store up choice food and olive oil, but fools gulp theirs down.” Proverbs 21:20
#54 Wood Carving: Father Christmas, Santa, holiday carvings
Father Christmas completed as promised.

A “gaggle” of carvings
As you can tell there are a passel of carvings completed here. To follow up on the story line you will need to go back to posts #21 and #25. In post #21 we introduced the process from blocks of wood to blanks to roughing out the shape. The blocks of wood were remains of other carvings varying in size from 1.5 x 1.5 x 4 to 3 x 3 x 8. Larger ones are in the works.

Short and wide

Tall and slender

Petit, inset face.
In post #25 we worked on details. Hair, mustache, eyebrows and robe fur were added with various size gouges. The eyes were set in place after a spot for them had been created. The eyes are elongated deep chip cuts. Also, one of the carvings has a coat of oil stain, a first attempt for me. I did not use oil on the other carvings.

Each size with its own challenges
So, here we have the last step. I have painted the carvings with a wash of acrylic paints. I used Folk Art Bright Red, Pure White and Metal Gold. The red was diluted with water at a ratio of about 15 drops water to one drop paint. The white had much less water, just enough so that the paint would run into the cracks and not gob up or clump up. The metal gold was painted on straight from the bottle. The final step was to dip each carving into boiled linseed oil which has a dab of burnt sienna oil pigment in it.

1.5 x 1.5 x 6.5 inches
I decided, after I had finished them of course, that a touch of green somewhere would have looked nice. Perhaps standing them on a green doily would make it work or surrounding them in a bunch of greens at Christmas time would give the color accent I am thinking of.

Two largest carvings at 3 x 3 x 8 inches
The pictures were taken outside in the sunshine – in December no less. I used a Canon Digital Elph – PowerShot, SD 1200 IS. I put up a card table and covered it with a white sheet. The natural light really makes the shadows work well. After loading the pictures on my computer I copied them into a new folder and then re-sized them for quick export into the blog or to friends on line.

Cute!

They are cute. Five of them have been given away already as Christmas presents. If you have an interest in them, let me know.
The tongue of the wise adorns knowledge,
but the mouth of the fool gushes folly. Proverbs 15:2
#43 Wood Carving: This is a test
MERRY CHRISTMAS TO ALL. AND A HAPPY NEW YEAR.
Technical difficulties yesterday. Suddenly my posts stopped showing up on Facebook. I am trying to figure out why this is so. While I am trying to figure that out – this post is really a test to see if I have marked the correct app in FB – enjoy a few more carving pictures.

Fahter Christmas

Father Chrsitmas, side view

Father Christmas, close up
“Suddenly a great company of the heavenly host appeared with the angel, praising God and saying,
‘Glory to God in the highest heaven,
and on earth peace to those on whom his favor rests.’
When the angels had left them and gone into heaven, the shepherds said to one another, ‘Let’s go to Bethlehem and see this thing that has happened, which the Lord has told us about.'” Luke 2:13-15
# 25 Wood Carving: The process – raw wood to Father Christmas/Santa gifts REVISITED
A few weeks ago you saw pictures of some Father Christmas carvings begun. At that time there was a promise to share progress.
But before I go any farther let me give credit where credit is due. The idea for this carving is not mine. The original pattern is from Mike Bloomquist. I have included his web site address here. The pattern, some great pictures and explanation are found in Carving Magazine, Issue #32, Holiday 2010, page 16. I am anticipating Mike’s painting techniques in a later issue.

Father Chrsitmas in various stages
The pictures included in the post are of my carvings. The first picture is of several carvings in various stages of completion. I also tried several different sizes to see what effect the carving

A trio of smiles
technique would have. Everyone who sees them responds to different ones. Some like the short, wide version and other like the tall, thinner ones. I prefer the wide, squat figures.

Details added, awaiting paint
You will notice that I have many carvings ready to paint. One tip for new carvers is to carve several pieces and then paint them all at once. Here I will paint mix up the colors I want for the faces and paint all of them at once. Then I will paint in all the robe colors if there is going to be any variation. Finally I will add all the trim colors.

Stages of a carving
Included here is a picture of the various stages a carving will go through. Left rear is our “rough out” or “blank.” You can see the lines drawn on it to give an idea of the carvings layout. (Thanks to my friend April for helping with some of the cut outs for the group meeting at my house bi-weekly) Next, rear right, is the initial cuts, “hogging off” or “wasting” to get rid of some of the wood for a basic

Painting begun, oil
shape. The third stage is front right. It has the major areas all set in place and has a few of the details added. Front left is a completed carving. All the details are now in place. One more step before carving will be to wash the piece, if I am going to use acrylic paints. As suggested by Phil and Vicki Bishop, I use

Another view
a solution of Simple Green to clean dirt, hand oil, pencil lines off the carving. And finally, in the center, is a carving which I have begun to paint.
If you looked closely at the painted carving you will notice some smudges of red on the trim. This is my first attempt at painting with oil. I need a spike on which to rest the carving so that my hands can be

Which size/shape do you like?
freeto control paint and avoid smudges. I was impatient to try the oil. It will cost me time to correct.
I will show some of the completed carvings in a later post. Perhaps you have some suggestions for color? Any suggestions for decoration of the robes? Let me know what you think.
John 20:31 (New International Version)
“But these are written that you may believe that Jesus is the Messiah, the Son of God, and that by believing you may have life in his name.”
#21 Wood Carving: The process – raw wood to Father Christmas/Santa gifts
I want to show you the process of carving from raw wood block to a carving ready for painting. In another blog we will talk about finishing and painting a piece. The carving I am working on is an Old World Father Christmas or Santa. The design is not original, but the carving is mine.
The first step in carving is to find a “blank.” As you see in the picture, it is a simple basswood block. It comes from the lumberyard cut in perfectly straight lines which makes the next stage of carving easier to carry out.

Carving process, basswood blank
The block still has the lumber yard saw cuts on it.
The next stage is cutting out the “rough out.” The second picture shows this carvings rough out. The one is very, very simple. Some

Carving process, rough out
rough outs are cut to a general shape which can look like a duck or a person without any detail. Other rough outs are done on duplicators which take wood off to about 1/4 to 1/2 an inch of the whole carving. In this rough out I have left a lot of extra wood because this is the first one of these I have tried. Leaving extra wood allows me to play with the process as the carving progresses.
The next step is clean the rough out. As you see in the second picture, the rough out is covered with saw marks. Every saw mark which

Carving process, rough outs awaiting cleaning.
is not remove will show up in the painting and finishing stages. Those marks left on the carving will accept or take paint differently than the rest of the carving.
They will show up in a most obvious and unwanted way.

Carving process, clean rough out
So, cleaning off the rough out is an important step in carving. Some preliminary carving could be done here, but the temptation to dig into the carving itself might cause you to miss some of the marks. On a simple rough out like this one it would be pretty hard to miss such marks. However, on more complex carvings, under noses, on checks, elbows, backs of heads or large flat surfaces are all prime places to leave marks. So, in the third picture you see a “cleaned” rough out. If you look closely at the left side of the carving you will see a pencil mark, the remnant of an “F.” While cleaning the rough out I decided which side of the carving would be the front, since I still have a choice on this carving – a more complex carving would require such a decision earlier.
Note on the rough out in picture two the straight pencil lines. These are maintain on the cleaned rough out as you can see on the right side of the carving. They will need to be taken off soon and they need to be replaced after the rough out is completely cleaned. They will help keep the carving in balance. Now that cleanup is completed the “setting in” stage begins.
“Setting in” or “blocking in” is the process of locating major masses of the carving. Since this carving is going

Carving process, setting in
to be an Old World Father Christmas or Santa, I have head, arms, body, robe masses to consider. All these were drawn on in pencil first. Then a “v-gouge” (a tool shaped like a “v”) was used to outline the masses named above.
In picture four you see some of the lines which have been cut into the cleaning rough out. At the bottom of the carving you can see the trim of the robe. Moving upward you have arms and then beard and

Carving process, another view
face masses. While I can change the sizes of these masses, once I have begun to set them in reality says that I can only make them smaller rather than larger.
This stage of carving is critical. I must make decisions which will affect the entire outcome of the carving. As you can see, once I have determined how high on the carving the arms should go I can not move the wood and lover the arms. Having decided where to “set in” the underside of the arms I am committed to the arm mass being there. I can thin the mass, shape it a little differently or add beautiful details, but I can not move it.
Once the masses have been set in I can begin to work on the details of the carving. As you can see in the final two picture, all the surfaces of the carving must be dealt with. When I say “dealt with” I mean I must make a decision about them.

carving process, detailing
How deep shall I go, what kind of surface treatment should I give, where within the mass should the minor details go.

Carving process, begin detailing 2
This stage can be a lot of fun for the carver.
You see the progress made so far. There are a few stage left before we have a completed carving. The mustache and beard need greater detail. Eye brows need to be added. The robe’s trim at arms and bottom need to have their surfaces gouged so they look a little more “furry.” I need to make a few more marks on the robe’s surface to make it “move” for the human eye.

Carving process, Two Father Christmas/Santas awaiting details
The final stage is painting. I will take pictures of the final detailing and painting for another blog in the near future. Happy carving.
Genesis 1:1 In the beginning God created the heavens and the earth.
#9 Old World Santas
 Persistence pays off. Even got them into the Gift Shop.
#8 New things are always exciting
Another post? Two in one day? Well, you know how new things go. At first they are exciting and interesting. They capture your attention and energy. So I am going with the flow. And making a commitment to keeping it up. There will not be two posts every day. My goal will be one new post a week. 
I had hoped to have some pictures to put right here. So far I have only gotten the link to an album. If I get things figured out before I send this post there may be a picture included. http://picasaweb.google.com/klompmakerpics/FatherChristmas?authkey=Gv1sRgCNqh4uyToa2VvQE#5332056132234861826
New ventures carry the risk of failure. In wood carving, too. At first you are not sure you want to try. The failure factor looms large. Then you take the plunge and the adrenaline flows. You try a little and find it pleasant. The project takes on a life of its own. Have you tried wood carving? There are many qualities to it as a hobby which causes me to recommend it to you. In future blogs I will try to clarify what I mean. For now, suffice it to say, if you haven’t every considered wood carving as a hobby you might want to.
So, I have been trying for the past hour to get an image on this blog. Obviously it is not here. New ventures carry risk of failure. I have failed to share a carving image with you – unless you use the URL provided above. Perhaps next time I will have learned to post a picture, painlessly. Still excited about the blog and the carving. Shalom.
PS. Checked out the post. Not sure why there is a big space in there. More to learn. jk
Psalm 23
