
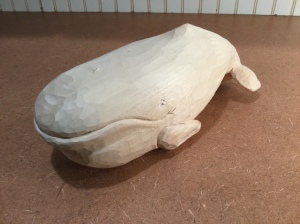
Work in Progress. A Wee Whale
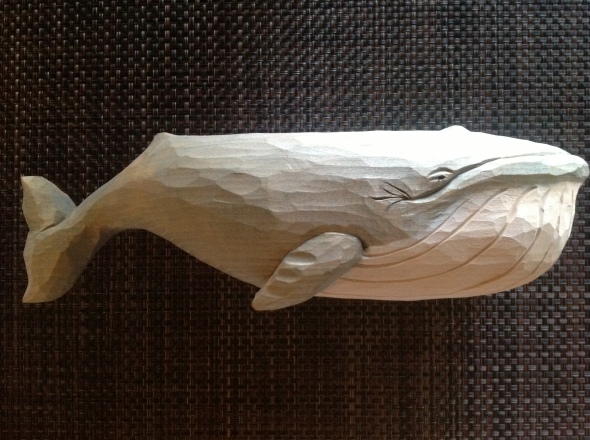
Basswood whale in progress. It began as a block 6 x 3 x 3. If you have looked through previous posts you have seen larger whales, half whales, and whales on driftwood. This piece was an experiment in making it mini so it would fit on a smaller shelf or in a better way on a desk or end table.
I like the overall feel of the work. The markings, while perhaps not realistic, give some sense of the wrinkles and folds, the hard treatment a whale’s hide can get. It’s cute.
Work to be done? Painting. I like the light wash of color several of the other whales have. There is no strong grain here so color will add another layer of interest. I painted and earlier basswood piece a solid “whale” grey. Not sure if I really liked it. This one will get a wash. Finally, then, finding a piece of wood on which to mount it and the angle of the mounting. Suggestions? The finished piece may take a while to arrive since the whale in is Michigan and I am in China.
Shalom.


“Pride goes before destruction, a haughty spirit before a fall.” Prov 16:18
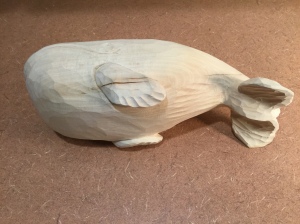
188 Carving Basswood in the round. Whales and tails.
Basswood is still a wood of choice. It works well, holds detail, and paints beautifully.
This whale will get painted, once we return to the States next summer. Then it will be mounted on Lake Michigan driftwood. A challenge in this carving was the tail. If you look closely at pictures four and five you will see faint black lines running through the piece. Most easily seen in the fin in picture four. These are cracks in the rough out. While much of the cracking could be cut out for the rough out, the made it necessary to position the tail as low in the block as possible. So, our whale will be diving over the front edge of a piece of driftwood to show off its gimpy left tail fluke and add motion to the carving as a whole.
How do you recover from project challenges?
Shalom.


“Whoever spares the rod hates their children, but the one who loves their children is careful to discipline them.” Prov 13:24
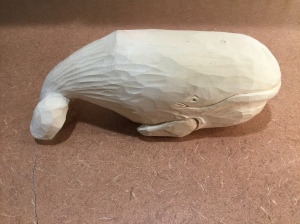
146 Hand carved. Sperm whale ala Moby fame.
There is much to like in this piece. The driftwood base and the whale work well together. And while the whale does not have the girth of a real whale, the coloring and markings are pleasing.
Note: The story of Moby Dick was based in part on a real whale named Mocha Dick found in the Pacific in the 1840’s, but the whale in the story has some inaccuracies.
Shalom.
“The generous will themselves be blessed, for they share their food with the poor.” Prov 22:9


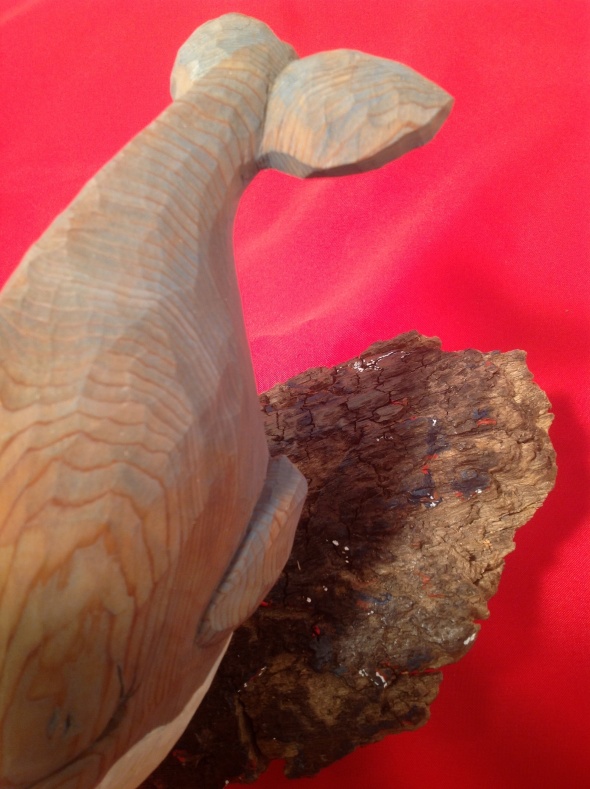
98 Whale ho!
 Stylized blue whale
Do any of you remember a childhood book entitled, “Burt Dow, Deep Water Man”? Author Robert McCloskey (http://www.robertmccloskeymemoir.com/) wrote about an east coast deep sea fisherman named Burt who ends up inside a whale in a gale. The story begins with Burt hooking a whooper, a whale. His tiny boat can’t hold the whale, so Burt removes his hook and patches the whales tail with colorful bandage. The story ends with Burt placing a colorful band-aid on the tails an entire pod of whales. You will have to read it to find out about the gale and the whale.
ref=”https://johnklompmaker.files.wordpress.com/2013/09/image7.jpg”> Acrylic wash over cedar finished with boiled linseed oil.[/ca

“https://johnklompmaker.files.wordpress.com/2013/09/image8.jpg”> Cedar wood grain comes through in interesting ways.[/captio

p://johnklompmaker.files.wordpress.com/2013/09/image9.jpg”> Smile
[/caption]I think the smile on this guy comes across really well. Of course, whales don’t smile, but if they did, this is what they would look like.
So, another whale. This one came out beautifully. While cedar is not the easiest wood to work with, an acrylic wash has allowed the cedar wood grain to pour through adding another dimension of texture to the piece. The whale is a stylized blue whale. The piece about 12 x x 4 without the base.
The base is a piece of lake drift wood. Some color has been added to give the feel of ocean floor. The colors seem a bit intense in these photos, but when the piece is sitting on a counter or mantel the colors come through more subtly. The mounting, at angle, gives the piece a little more movement. I really like the last picture. The shadow and light make for a happy face.
This whale is now part of the collection of Mr. Rick Buteyn.
Shalom.
“It is not good to be partial to the wicked and so deprive the innocent of justice.” Proverbs 18:5
95 more carvings coming.
I had to relearn the WordPress process. It has been such a long time that I posted that WordPress has changed its process. The last post had only one picture because I kept adding pictures, paying no attention to the fact that I was merely replacing each previous picture with the new one. So, I have included in this post three more photos of the blue whale and a few others that were completed this summer. 

 No, the whale is not dead. I took several pictures with my iPad with natural light streaming over my shoulder. I wanted to see what the light would do for the carving shadows. You tell me if there is a difference between the photo in post 94 and the one above.
 A small bird carved from a piece of scrap wood. Texture created by running a small u-gouge over entire bird giving a feather effect.
 Another view. I like looking at pictures of completed carvings. They remind me of the decisions made while in the carving process. Notice the tail. Its location and thickness was an important part of what gives chunk of wood its bird-ness.
 While there is much about this bird that I like, the beak on the next ones, three waiting to be painted, will be stronger. Shalom. Need a great verse from the Bible today? Try Genesis 3:15. The first great promise of the Word.
94 Finally another post
Blue whale – basswood, acrylic wash, boiled linseed oil. 12x4x2 inches. Wall hanging
#60 Wood carving: Pelicans, whales and turtles, wood carving is everywhere.

Intarsia pelican
Beautiful wood work shows up everywhere. One just needs to have an eye for it. The pictures in this post were taken by one of my daughter’s while on a trip to Florida this winter. I love the “rope work” frame around the pelican here. Also, the artist has done a great job with the use of white to hold the piece together.

Right whale

Top view

Head shot of right whale 1
You have seen whales here before. Always like to view carvings of whales. This one is a “right” whale. Whalers named it so because it was considered the right whale to hunt. When struck with a harpoon, this whale would stay afloat so whalers had an easier time of processing it.
I like the overhead shot best. The lines look clean. I am not so thrilled with the head shot, the manufactured eye does not sit well in the head, from my perspective. I would also like to see a rougher surface on the whale, they are not as smooth or clean looking as this carving presents.

Sea turtles
These two sea turtles make a great presentation. Great negative space, nice movement created by the turn of their heads and the spacing of their bodies on the stand. A pleasing presentation. I think they may be Green Sea Turtles. For my taste, however, I would like a little more detail on the rear flippers on each turtle.
What are you carving these days? Have anything to share? Would love to hear from you.
“Pride goes before destruction, a haughty spirit before a fall.” Proverbs 16:18
#46 Wood Carving: Humpback Whale completed

Humpback whale completed
I like getting things accomplished. My family says I live with lists, long lists, unrealistic lists – at times, but lists which get updated, rearranged, added to and subtracted from all the time. Lists make my life a little easier and keep me from forgetting to do the things to which I have committed.

humpback, top view

Headed for the surface

Humpback, side view
This post is one of the things on my list. I have promised carvings to many people always with the caveat: it will get there when it gets there. Several months ago I did a sperm whale for a family member. It was well received. And then came the next line we know, “Could you do a humpback?” Don’t get me wrong, I like being asked to carve things. I just like to get them finished in my own time. Carving is a hobby, not my job. So, the humpback stayed on the list.
Then Christmas comes and lists get pushed. People call, my conscience clangs a little louder, my table of partially completed carvings gets more loaded down. I have to complete something. Family first. So, the whale.

Brushes used

Drill and dowel for mounting

My work space for painting
Of course, there is always more to it than the non-carver knows. Resources need to be rounded up – wood, tools, paint, brushes, base, pictures, dimensions, color choices, finishes, time. Tools include knives, gouges, pencil, drill, ruler, diagrams,
And not everything works the first time. On this whale I had a struggle with two things. First was the curve of the spine and its effect on the position of the tail. In fact, this whale is a second piece. The first is sitting on my carving table. After I began I wanted more motion in the piece – as I related in the first post on the whale.
The second difficulty was with the fins. Without giving away too many things, let me just say that I broke one of them off twice!
That is the down side. The up side is, as always, when one carves one learns all kinds of things. I did not realize the colors one finds on a humpback. I was ready with my basic black and white, perhaps some grays. But when I researched the whale I noticed many other colors. Some come from the barnacles and seaweed attached. Some of the skin colors I can not explain. I include here a list of the paints I used for this piece:
Folk Art 479 Pure Black; Folk Art 480 Titanium White; Folk Art 922 Bay Berry; Cermacoat 2116 Black Green; Cermacoat 2044 Coral; Deft Clear Wood Finish – Gloss (first coat); Krylon No. 1311 – Matte finish (final coats)

Paints used
Another upside is that one learns much about the subject being carved. The humpback is a baleen whale and a rorqual whale that sings amazing and beautiful songs. (wikipedia) The knobs on their heads are tubercles – hair follicles. Would certainly make it hard to shave.

Front view

A final view – more of the base

okay, one more
The base of the carving is a piece of drift wood. Sad to say, I have not identified the wood type. It is heavy, but that may just be the sand imbedded or it is a type of wood like manzanita. I like the reddish color and the shape which accents the whale nicely.
Now the final step. Tomorrow this humpback whale will leave my house.
“Then God said, ‘Let us make mankind in our image, in our likeness, so that they may rule over the fish in the sea and the birds in the sky, over the livestock and all the wild animals, and over all the creatures that move along the ground.’” Genesis 1:26
# 40 Wood Carving: New whale coming.

whale-images.com
New whale is laying on the table. It is to be a humpback whale. This whale is easily identified by its distinctive fins and its “hump” when it dives. It also has unique spots on its jaws, upper and lower, and on its fins. The humpback tail is also rather ragged looking, with gaps, gouges or notches along the edges.
Here is a good beginning, the fins look kind of cool, but need more work.

Humpback, upsidedown, 12″ x 3″ x 3″
The tail doesn’t look right yet, but it has potential. There is plenty of wood in the tail section. I am trying to get some movement in the whale so I left a large block on the end and I am working to twist the spine of the whale and thus the tail. When complete it is to look like the whale is heading for the surface, twisting its tail for power. and I lost the picture for the mouth/eye set up. Good thing there is a computer to search. Now it needs all the bumps and grooves to make it look less like a block of wood.

Rough form, some detail begun.
The next picture shows the beginning work on the whales head and jaws. One account says the species can be identified by its “knobbly” head. The knobs are called tubercles, which are hair follicles. It is more difficult than I thought it would be to keep the general shape of the head and get the knobs to look like they belong.

The jaws will be closed. The knobs here are adding even more difficulty to keeping the shape intact. The space behind the knobs on the head will need to be narrowed and made to come to a blunt point to hold the blow hole.

Closeup of head and jaws

Twist in the spine for movement
The fins are attached after the body has been shaped. I drilled holes into the body and then, having left extra length on the fin blanks, I shaped them to fit into the holes. I have to work at how to make this process go faster and allow for more experimenting with the position of the fins.
The pectoral fins on along each side do not quit have the movement in them I had hoped for, but perhaps edges and surface will capture some of the whales’ qualities. The movement of the spine can be seen in the last picture. The whale is going to be supported on a base tail down, head to the surface. This will show off the fins and the tail twist. Not quit a breaching humpback, but a good beginning.

restaurantdiningcritiques.com
“Dear one, do not let wisdom and understanding out of your sight,
preserve sound judgment and discretion;
they will be life for you,
an ornament to grace your neck.” Proverbs 3 : 20, 21
